The hardwire kit can be powered either through:
- The Type-C port: Refer to the user manual of the 70mai hardwire kit connection cable you’ve purchased to wire the hardwire kit.
- The DC jack port: Follow the steps below to wire the DC jack cable.
Before wiring, turn off the car engine and power to prevent short circuit.
Step 1. Selecting the suitable fuse box
Select the car fuse box that contains the following fuses:
- Regular electric fuse with an output voltage of 12–30V.
- ACC power fuse.
Step 2. Connecting wires
Connect the wires of the DC jack cable to the fuses inside of the fuse box in the following way:
- Connect the power wire (red) to the regular electric fuse with an output voltage of 12–30V.
- Connect the ACC signal wire (yellow) to the ACC power fuse.
- Connect the ground wire (black) to the negative terminal or the ground of the fuse box.
Step 3. Testing circuit and ACC signal
Test the circuit and ACC signal in the following way:
- Insert the plug of the DC jack cable into the DC jack port of the hardwire kit.
- Insert the Type-C plug of the hardwire kit into the power port (DC/IN) of the main device.
- Start the car engine, press the power button of the hardwire kit and wait for the main device to turn on.
If the main device fails to power on, turn it on manually. If the message “Connect to an external power source” is shown, check if the DC jack cable is correctly connected to the regular electric fuse. - After the main device turns on, press the power button of the hardwire kit, turn off the engine, and remove the key. Check if the main device powers off.
Note: For some cars, the ACC power off signal is only triggered when the driver seat door is opened after the engine is turned off. Some car models only trigger the ACC power off signal after the engine has been turned off for a certain period of time. For such cars, check if the main device powers off after the ACC power is turned off. - After the main device powers off, restart the engine and check if the main device automatically turns on.
If the above steps can be proceeded correctly, the circuit and ACC signal test is passed.
If the test fails, please check the wiring of the DC jack cable and ensure that the fuses and ground are correctly connected to the correct wires.
If the connection is correct, but the test fails, contact after-sales service for assistance.
Step 4. Installing the hardwire kit
1. Selecting an optimal position for the hardwire kit
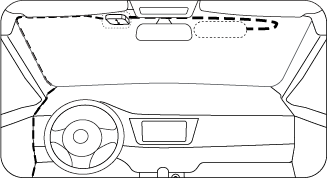
Select an optimal position for the hardwire kit, preferably to the left of the interior rear-view mirror, as shown in the illustration.
2. Attaching the hardwire kit
a. Paste the electrostatic sticker to the selected area on the front windshield. Press the sticker to squeeze air bubbles out.
b. Remove the release liner on the back of the hardwire kit and paste it to the electrostatic sticker.
Step 5. Managing the cables
- Routing the Type-C cable
a. Route the Type-C cable of the hardwire kit under the headliner along the top of the windshield.b. Use a wiring trim tool to hide the cable underneath the vehicle’s headliner. - Managing the DC jack cable
Tuck the DC jack cable of the hardwire kit inside the gap between the dashboard and the A-pillar to the fuse box.
If the DC jack cable of the hardwire kit is too long, coil it up, but do not cut it. Cutting the cable will affect the power and ACC signal transmission to the main device.
Notes:
- Location of the fuse box and the recommended mounting position of the main device (2) and the hardwire kit (1) may vary from vehicle to vehicle.
- Please employ a professional technician for mounting according to the vehicle condition. The illustration provided is for reference only.
- For optimal network connection, install the hardwire kit as shown in the illustration.