Step 1 – Test video signal
- Turn off the engine and the power;
- Connect the backup camera with the video signal wire (connect ports A and B together);
- Connect the red backup signal wire to the positive pole of the power cord of the backup light of the car;
- Insert the power port into the video signal input port of the video receiving device (for example: an AV/IN port of 70mai in-car product);
- Ignite and start the car, followed by putting it in reverse gear and observing whether the video receiving device can obtain the image from the backup camera.
If the image could be obtained, please proceed to Step 2 – Arrange wires; if the image could not be obtained, please check whether the wiring is correct.
If the wiring is correct while the image still could not be obtained, please contact after-sales service personnel.
Step 2 – Arrange wires
- Turn off the engine and the power;
- Have the power port arranged to the front cockpit/co-cockpit of the car along the car body, and connected with the video signal input port of the video receiving device (for example: an AV/IN port of 70mai in-car product);
- Arrange the joint end (port B) of the video signal wire to the trunk lid of the car along the car body, connect the red backup signal wire with the positive pole of the power cord of the backup light of the car, and secure the black wire with insulating glue;
- Connect the backup camera with the video signal wire (connect ports A and B together);
- Drag the backup camera to the planned installation location, adjust the exposed length of the video signal wire.
Step 3 – Install backup camera
- Keep the engine turned off and turn off the power;
- Disconnect the backup camera from the video signal wire;
- Make holes on the car body where the backup camera needs to be installed (fixing screw holes on both sides and backup camera lead wire in the middle);
- Pass the backup camera lead wire through the middle opening hole, followed by connecting the backup camera with the video signal wire (connecting ports A and B together);
- Secure the backup camera onto the car body where the opening holes are with screws.
Tips: When determining the installation location, temporary fixing may be performed by using the adhesive provided in the package.
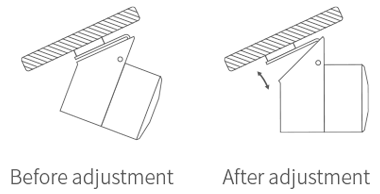
Step 4 – Adjust the angle of backup camera
Tear off the protective film on the surface of the backup camera, followed by adjusting the angle of the backup camera up and down to ensure that the backup camera is parallel to the ground. As shown in the figures below:
Tips: The installation and wiring methods for different vehicles may differ from what described in the user manual. The installation shall be conducted by a professional installer.
Before installation and wiring, please turn off the engine and the power in order to avoid short circuit during operation.